
I have had some questions about how I make the embellished gemstone designs, and I thought I'd share a little more about that process. I've shown you the steps to making a rimless bezel setting, here, but now I'll show you what happens once the bezel and back plate are soldered together.
Mostly I sketch a rough idea first, though a select few of these pieces actually come together all at once at the work table. The rough idea may or may not end up being part (or no part) of the final piece. I am a bit of a "punter" with this kind of work; I use estimates and guesses and fiddle around until things look good to my eye. I hate to measure, so unless I'm making earrings I don't measure anything. :)
I start out with the bezel on a piece of painter's tape, and then I add in the pre-shaped pieces until I have a design I like:
 The design laid out the way I want it. Nothing is soldered in place yet, they're all just loosely resting on the tape. At this point I will often snap a photo with my cell phone so I can reference the placement of the embellishments if necessary.

Sorry for the blurry-ness of these quick snaps. But you get the gist, I hope. Anyhoo, the only thing different above is that I've marked up several areas with a Sharpie. Kind of hard to see but the blue spots (including the blue areas inside the bezel itself - mostly running down along the left side of the pendant (your left as you look at the photo) are guidelines for where I"ll place the solder. Otherwise once I remove the separate pieces I will have no clue where exactly the solder should go.

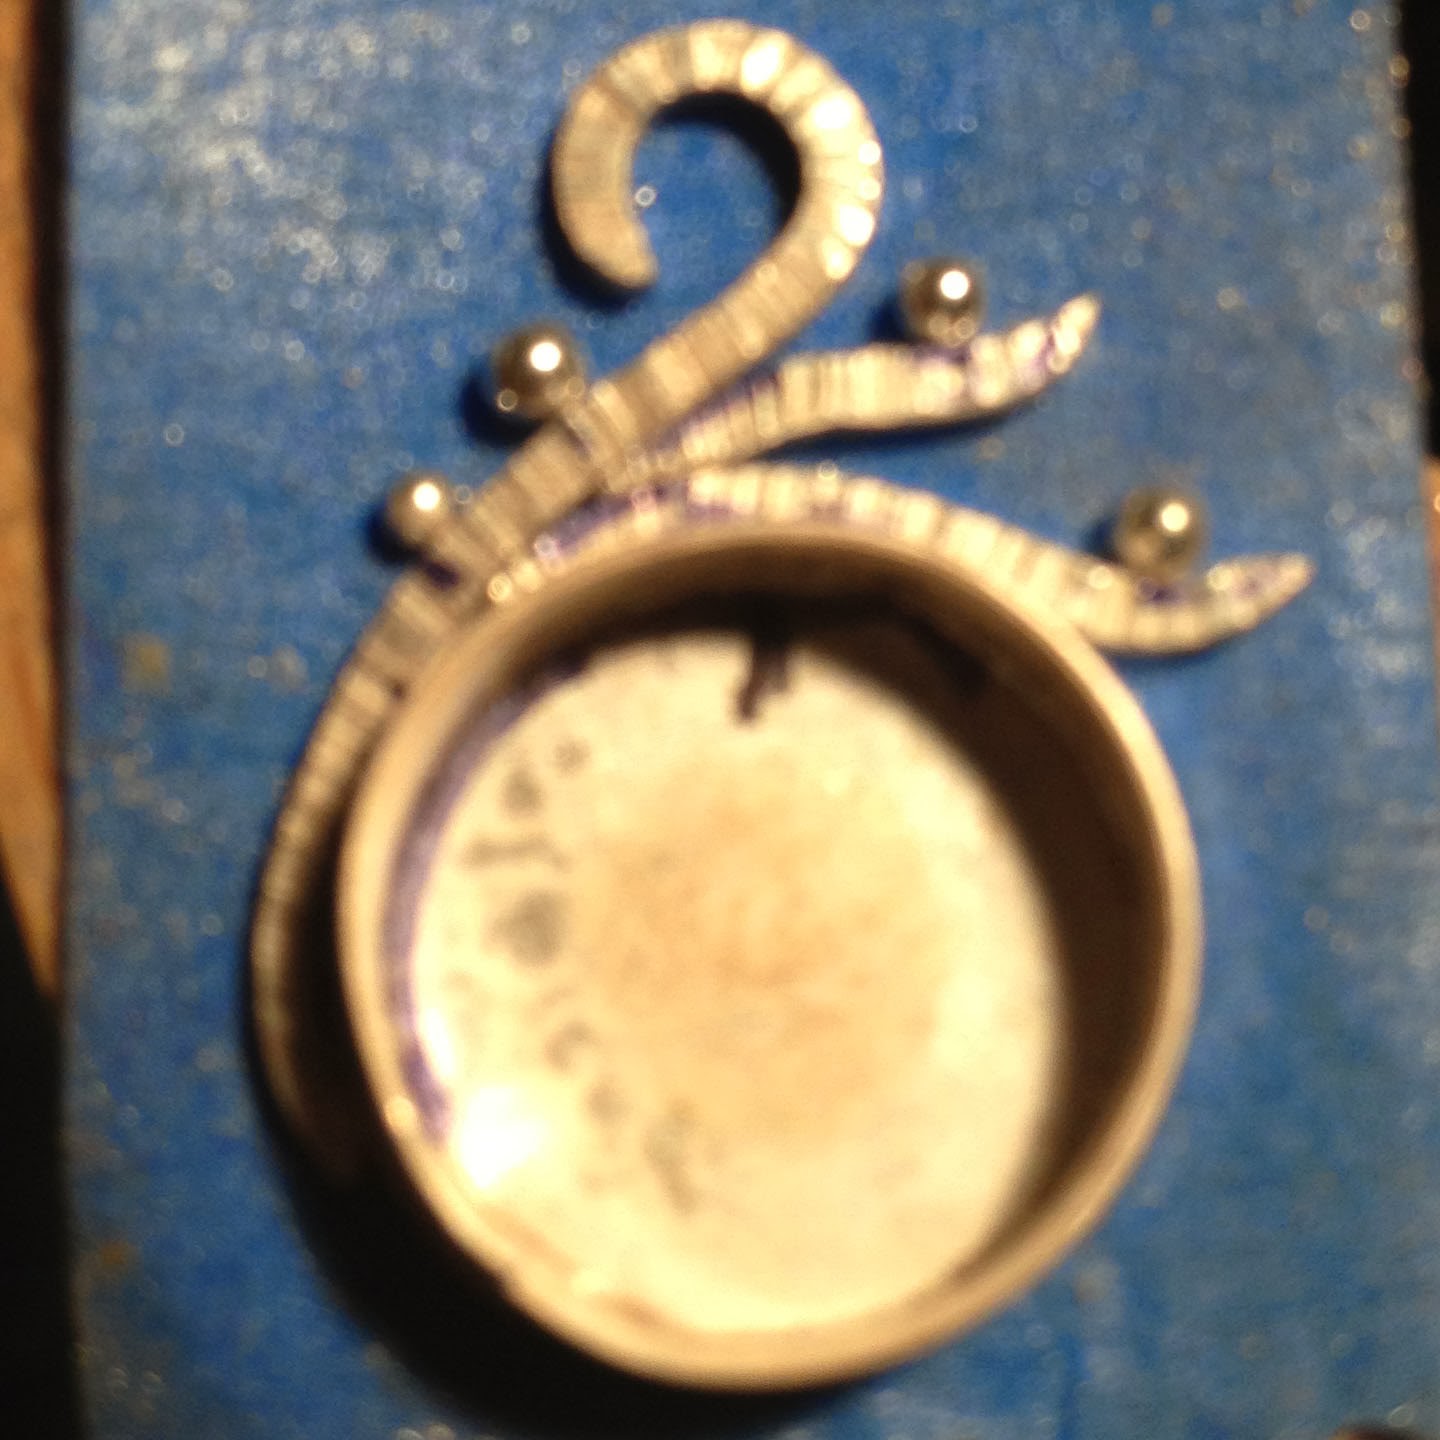
Wire embellishments have been soldered in place. If you look closely at the lower level "wing" on the right side of the photo, you'll see that some solder ended up on top of my texture. That will have to be removed in the cleanup process.

Balls are now also soldered in place. This is typically a pretty happy moment so I put in a smiley face. The only thing left is to solder the bail, and then I can move on to the clean up process.

I actually got excited about making this design and forgot to do a stone check once I'd soldered down the bezel, so I did it after the extras have been added. Fortunately it still fits! The dental floss is there to remove the stone, otherwise I'd have no easy way to get it back out and it's nowhere near ready to be set yet.

Bail's on! I cut a piece of tubing and soldered it on to the pendant. The chain will run through the bail and out the other side so the pendant slides freely.
Next is the cleanup process and then finally the stone can be set:

Voila! Now you know a little more about how the magic happens. :)
Mostly I sketch a rough idea first, though a select few of these pieces actually come together all at once at the work table. The rough idea may or may not end up being part (or no part) of the final piece. I am a bit of a "punter" with this kind of work; I use estimates and guesses and fiddle around until things look good to my eye. I hate to measure, so unless I'm making earrings I don't measure anything. :)
I start out with the bezel on a piece of painter's tape, and then I add in the pre-shaped pieces until I have a design I like:

Sorry for the blurry-ness of these quick snaps. But you get the gist, I hope. Anyhoo, the only thing different above is that I've marked up several areas with a Sharpie. Kind of hard to see but the blue spots (including the blue areas inside the bezel itself - mostly running down along the left side of the pendant (your left as you look at the photo) are guidelines for where I"ll place the solder. Otherwise once I remove the separate pieces I will have no clue where exactly the solder should go.

Wire embellishments have been soldered in place. If you look closely at the lower level "wing" on the right side of the photo, you'll see that some solder ended up on top of my texture. That will have to be removed in the cleanup process.

Balls are now also soldered in place. This is typically a pretty happy moment so I put in a smiley face. The only thing left is to solder the bail, and then I can move on to the clean up process.

I actually got excited about making this design and forgot to do a stone check once I'd soldered down the bezel, so I did it after the extras have been added. Fortunately it still fits! The dental floss is there to remove the stone, otherwise I'd have no easy way to get it back out and it's nowhere near ready to be set yet.

Bail's on! I cut a piece of tubing and soldered it on to the pendant. The chain will run through the bail and out the other side so the pendant slides freely.
Next is the cleanup process and then finally the stone can be set:

Voila! Now you know a little more about how the magic happens. :)
No comments:
Post a Comment